

“The first lesson you learn is don’t be angry at anybody because your weaving will show it, and don’t think angry thoughts, and make sure your house is clean…”
–Haida Weaver Delores Churchill
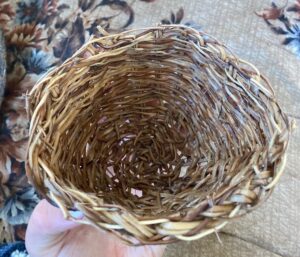
The first basket I ever wove was a gods eye pattern of red osier dogwood (Cornus sericea L., Cornaceae). I was in Maine, where dogwood is abundant, but when I moved back to Alaska, I needed to find other resources for weaving. Grasses proved more complicated than I wanted, and the willows around my house were too short and irregular. Finally it occurred to me to use the material growing all around me: spruce roots, traditionally used by Southcentral Indigenous peoples for many weaving projects. Early in my research I found a YouTube video series produced by the Sealaska Heritage Institute and spearheaded by Delores Churchill. Delores learned to weave from her mother as an adult with the goal of preserving Haida weaving knowledge. She has also learned to weave in the Tlingit style, and teaches both methods. The video series demonstrates and is broken into the different steps of weaving a basket. Each step is explained and demonstrated by a different person, while Delores watches the weavers and occasionally adds comments. The series also includes videos on the meaning and mathematical planning of design embroidery as well as other topics discussed by Delores. I could not have completed this project without the video series, and I’m grateful that the Delores and the other weavers have chosen to share their knowledge.
Tools:
Small knife (traditionally a blue mussel shell [Emmons, 1991])
Needle
Awl
Bear canine tooth
Bowl/spray bottle of water
Note: I’ve learned these are all of the tools necessary for a basket, although there are many more helpful tools to have such as graph paper and scissors. I only had a knife and bowl of water for weaving.
The process of weaving a spruce root basket:
The video steps I followed were:
- Harvesting, processing spruce roots
- Starting a basket
- Turning the edge of the basket
- Adding weaver, starting the sides
- Finishing a basket
There were other videos demonstrating different weave techniques that I watched but did not incorporate, as I wanted to stick to basics for my first attempt.
- Harvesting, processing spruce roots
The first and most important step in weaving is harvesting and preparing the roots. My biggest difficulty in weaving the basket was underestimating the importance of this step. Harvesting spruce roots in the spring and late fall yields the most pleasing and even colored roots (Emmons, 1993). According to Hans Chester (2019), roots should be harvested from open, mossy areas where the ground feels spongy underfoot. Additionally, the roots should be as long as possible, pencil size or smaller, and harvested from areas where the spruce are around 8-10 inches in diameter. Roots from older trees can be tougher to work with, and younger strands can be weak (Emmons, 1993). After harvest, the roots should be coiled, and roasted gently over the fire to burn fine strands and make the bark peel easier (Churchill, 2019). They are run through a forked stake in the ground, which Delores calls an eena. To avoid sap drying the bark to the root and blemishing the shiny outer layer, bark should be removed the same day the roots are harvested (Emmons, 1993).
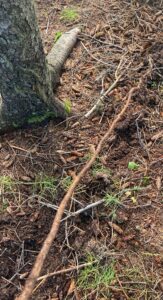

I did not roast my roots, because I understand that the timing and heat of the fire are critical and a difficult skill to master. I simply tried pulling my roots through an eena, which was helpful, but not as smooth as I expected. While faster than peeling all roots by hand, it still took a long time and I had to do some manual peeling after pulling the root through the fork. I believe the slit in my eena was not large enough. The tightness of the eena on the roots is not due to the size of the fork, but rather pressure applied with the other hand, and I did not realize this. I also think some of the roots I harvested were too large, and that I should have been more consistent in the size of roots I chose. Additionally, the area I harvested in was too crowded with trees, and I could not get long lengths of root. Ideally, harvested roots should be one to six meters in length, but mine were only about a foot and a half (Mukhopadhyay, 2008). The weavers used in later stages are at least an arms-length long. Tlingit and Alutiiq baskets are woven with Sitka spruce roots (Lee, 2006), so I wonder if the spruce species makes a difference. Roots can be used right away, but it is preferable to let them season for several months, soaking them when it is time to weave (Emmons, 1993). I probably let my roots sit about 2 weeks, and soaked them for two days before splitting. After I begun the project, I left the partial basket and my roots submerged in a pot of water so that they would be pliable whenever I got a chance to work.
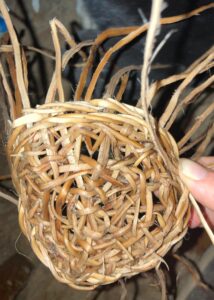
Splitting turned out to be way more complicated than I expected. In the instructional video they simply say to split the root in half along the line of small dots on the spruce root, but don’t continue to describe the splitting process, so I thought that was all I needed to do. As I was starting to weave I noticed that my weavers and wefts were much bulkier than those used in the videos. Many of the materials in the video appeared thin and flat, obviously not full half roots. I was not sure how to further split the roots, and some I’d split so unevenly I could not re-split them, so I decided to keep going with the materials I had. This decision would plague me throughout the project. I ended up further splitting all my long weavers (woofs) because it was impossible to weave with the original size. Once I had weaved the base of the basket, I could not split my original warps, which are the vertical pieces of the basket, so these made it difficult to shape and finish the basket (due to their stiffness). I realized later that each root should yield four warp strands, and 2-4 woof strands (Emmons, 1993). Each root possesses three distinct parts, which are used differently: there is the outer, shiny layer that is often used as a weaver to give the basket a shiny exterior, the rougher layer beneath the outer one that is still strong for weaving and usually constitutes the woof strand, and the soft inner core of the spruce root that is discarded (Emmons, 1991). In the Sealaska videos, the shiny side of the weaver is constantly oriented to face outward throughout the process. Due to my messy, improperly split materials, I had to abandon that particular goal for the project. Next time, however, I have a better feel for manipulating and splitting spruce roots, so I can try maintaining a shiny outside.
- Starting a basket
Woof strands should be stored in skeins, and warp strands in coils so they can be easily distinguished (Emmons, 1993). The roots should be regularly wetted, or at least your fingers, to keep the roots pliable when weaving. It is also helpful to have a knife nearby at all times. I started with six warp strands and tied the middle of a woof strand to the middle of the warps. This situated me to begin weaving a two-strand twining around the warps that slowly spread them out like evenly like radii. I continued to weave and add warps until I reached the desired size of the base of my basket.
- Turning the edge of the basket
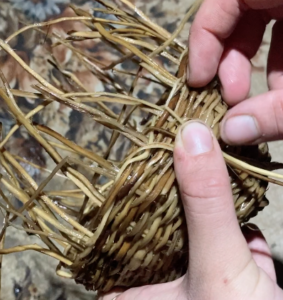
This step involved adding a third woof strand to my project, each one separated by a warp. I bent the warps upwards, in toward my base, and used a three strand weave that is often described as having a braided or twisting rope appearance.

- Adding weaver, starting the sides
It is not until this step that the videos demonstrate how to transition from the end of a weaver to a new length of weaver. Because my weavers were so short, I had already run out of weaver once, and not knowing what to do I simply tied a new weaver to the end of my old one. Because I was not incorporating any designs into my basket, I continued with a simple two strand twining up the sides of my basket.

- Finishing the basket
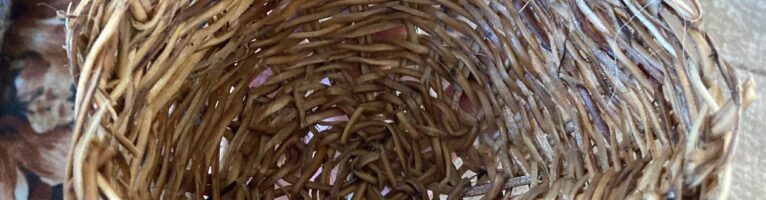
To finish the basket, the videos demonstrated a variant of the same three-strand braiding weave I used to turn the edge of the basket. Each warp strand is folded down along the outside edge of the basket, and the three-strand weave fixes it in place. The warp strand can then be cut just below the braid. Because my warp strands were so thick and tough and my woof strands appropriately small and thin (although sometimes too thin and weak), the braid could not hold the folded warp strands down. The video also never demonstrated what to do with the three woof strands after the final weave, so I just pulled them tight, tucked them into the inside of the basket, and snipped them. Even as I finished, the warps were pulling the braid out of place and escaping. According to Emmons (1993), the fraying of a basket’s border indicates it has reached irreparable age. I suppose that predicts the longevity of my first project basket…

The weaving process was a blend of excitement, satisfaction, and severe frustration. While I had several resources discussing the art of spruce root baskets, and one in particular that described various weaves in detail, I had no resources but the video series that actually outlined the process. I was entirely dependent on the series from the beginning weave to the finishing one. Even with the experience of weaving a basket, I doubt I could incorporate many of the weaving styles that are simply described in books. I think I’m more of a visual and tactile learner. Luckily, the videos were filmed from next to the weaver so I could watch the movements straight on, and didn’t have to mirror the movements. There are so many different strands in a basket though, that it was difficult to catch the weave pattern behind the weaver’s fingers. I would re-watch 10 second segments of video sometimes twenty times in a row, just trying to understand what was happening. Or I would grasp the idea, weave several stitches, then find myself with weavers or warps in the wrong place and have to undo several steps and re-watch the video segment several times over again. There was one segment early in the basket, part of the first video, that I watched over fifty times. I followed every step precisely, stopping the video after each one, making sure I’d done the movement right. I finally realized that there was a skip in the video, and that was why my step-by-step was not ending in the same place. I’m pretty sure that what was skipped over was just repetitions of the same weave pattern, no new techniques or movements, but I did not have a handle on the pattern, so I really needed a continued demonstration, movement by movement. I ended up just stumbling a weave through that skip, and I don’t know if I did it right. Another difficulty was the transitions between the steps, because they were broken up into separate videos. In the end of one section I would be completing a row with a two-strand weave and weaving between pairs of warps, but in the beginning of the video for the next step the weaver would have three strands separated only by one warp, not a pair. I had absolutely no idea how to transition from one to the other, nor were there any book or media resources to clarify. Each time this happened I would just manipulate my strands to the necessary starting positions for that video, but sometimes this was messy. If I’d been incorporating any sort of pattern, or if my weave had been tight enough for the evenness of the weave to be apparent, my make-it-up strategy would have stood out on the basket. There was one step where I watched the demonstration several times before realizing it was a weave I already knew. This weaver was different than the woman who had first shown me the weave, and they moved the strands in a different way so I didn’t recognize the movements.
After struggling through this video series I can definitely appreciate the value of an experienced in-person teacher. By the end of the basket I was sad that I had not harvested more spruce roots before the freeze. Delores Churchill flashes a big smile as she describes the joy of weaving in one of the videos, she reflects on the meditative qualities of weaving a spruce basket. Despite my learning frustration, I understand her sentiment and want to develop skills in spruce basket weaving. I am excited to learn from my mistakes and try my hand at another basket.
While I didn’t incorporate any designs into my basket and precisely followed the weaves outlined in the videos, other weaving styles and the process of designing and embroidering a basket are impressive and fascinating.
Types of Weave:

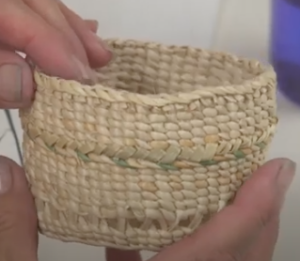
A two-strand twining weave is most common. Delores calls the weave compact twining and describes how it was traditionally used to make watertight spruce root vessels. An awl is used to regularly compact the rows, and a bear’s tooth is rubbed on the basket’s exterior to spread out the fibers (Churchill, 2019). Vessels woven this way were traditionally used by Tlingit peoples as water cups, and for cooking food using the hot rocks method (Emmons, 1991). Delores calls a looser variation of this weave space twining. Gaps are left between rows, forming a strainer-type vessel. Delores calls it a clam basket and describes how you can rinse clams off in the basket because the water flows freely and washes the sand away through the gaps (2019). There is a variation of the compact twining called the strawberry weave, where one of the woof strands is dyed (Emmons, 1993).
There are several weaves that use three woof strands. I used a three-strand weave to turn the edge of my basket and to finish the border. This weave is typically used to turn the edge of the basket, and can also be woven for several rows to strengthen the basket base (Emmons, 1991). It is often described as having a twisted rope or braid-like appearance. The weave is also important for Tlingit hats (Emmons, 1993). A different three-woof strand has been used on larger Chilkat baskets to conserve woof materials (Emmons, 1993). The weave consists of the two-strand twining on every other row. In between is a single woof strand that weaves between the warps.
There is also an eyehole weave, which I don’t really understand. It involves crossing warps diagonally (even warps in one direction, odd warps in the opposite) and weaving them in place to form a mesh-like appearance (Emmons, 1993).

While there are many other weaves, these seem to be the most common. Delores notes that Haida baskets are woven downwards with the base at the top, while Tlingit and Tsimshian baskets are woven right side up (2019). Most Tlingit baskets are cylindrical in shape, many had handles, and before tourism demands, few had lids (Emmons, 1991). There were many different sizes of baskets suited for different purposes. The ratio of height to width also varied according to purpose (Mukhopadhyay, 2008).
Basket Patterns:
While dyed spruce roots are sometimes used for basket designs, other materials like grasses and maidenhair fern are often incorporated. Maidenhair fern has a purple-hued stem, making it popular for basket embroidery (Emmons, 1993). A variety of grasses were used, and some were dyed while others were valued for their color. Different materials were specifically used for different basket types (Emmons, 1993). Grasses were harvested in early summer, boiled, and then dried to bleach them.
Historically, various berries and natural materials were used to dye spruce roots and grasses. The huckleberry (Vaccinium ovalifolium) was used for purple along with blueberries, and red was developed by boiling nettle (Urtica Lyalii) in urine or steeping the roots in urine inside an alder (Alnus oregona) vessel (Emmons, 1993). Additionally, sulphur springs or charcoal baths could develop black, and Evernia vulpine, a yellow lichen, could produce yellow (Emmons, 1991).
Jennie Wheeler dyes spruce roots in one of the Sealaska videos (2019). She uses Rit Dye, which is a fabric dye. She boils two cups of water and two capfuls of dye, and then turns off the heat. Immediately after she submerges the spruce roots and lets them soak for twenty minutes. Afterwards, she sprays the roots with color stay and lets them sit for twenty minutes. Finally, she rinses the roots in rainwater mixed with three capfuls of vinegar.
Design patterns varied according to the purpose of the basket. Work baskets were usually simple in design, rarely more intricate than the strawberry weave, but other baskets, particularly those with ceremonial functions, had more elaborate weaving patterns (Emmons, 1993). Deborah Head discusses the significance of basket designs in one of the videos in the series (2019). She seems to view the design as the heart of the basket, and notes that’s nearly all baskets have designs. She explains that basket patterns are connected to family crests and family stories. She acknowledges that these connections could be called ‘intellectual property’, and that if she wanted to use a design she would ask the family or the tribal chief for permission. There are some patterns and designs that are commonly shared, such as the solid line or half the head of the salmon berry. Deborah thinks it is important to share even the family designs in order to help preserve the culture and knowledge.
Tlingit basketry designs are mathematically complex. There are many important considerations for a design. There is the symmetry of the design itself, which must be mapped out across the number of warps, but also the symmetry of the entire basket. The exact number of warps must be known and monitored to produce a design. Deborah explains that for diagonal patterns an odd number of warps is required, and for vertical patterns, an even number of warps is necessary. A standard basket is usually woven with an even number of warps. The designs are now graphed out using graph paper, but I marvel at this mathematical planning before that resource was available. Just thinking about it makes my brain hurt.
Molly Lee has observed differences in design patterns between Alutiiq and Tlingit baskets (2006). She notes that Alutiiq baskets sometimes use the rougher inner spruce root as woof strands as well as warp strands, resulting in a matte-like overall basket appearance. She also identifies dots, crosses, bars and Xs as present on Alutiiq baskets but unrecorded for Tlingit baskets. Furthermore she describes Alutiiq baskets as often having a primary and secondary design field, while Tlingit baskets have evenly disbursed patterns or supplemental patterns that do not encircle the basket. I am skeptical of her findings because her sample size was small, and she also did not acknowledge the bias of only studying museum baskets.
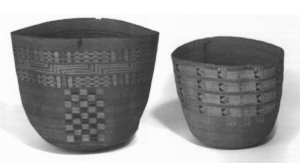
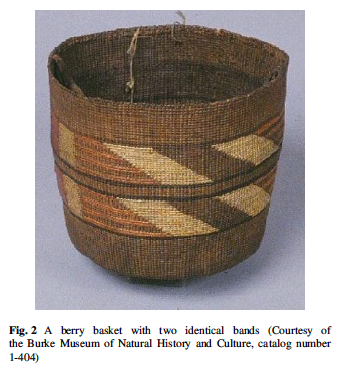
Mukhopadhyay, who explored the mathematics of Tlingit basket design, acknowledges that the baskets and artifacts in museums are often oriented toward outsiders and may not be representative of Tlingit basketry (2008). Considering that Mukhopadhyay only had access to museum specimens, they recognize the bias this may have had on their findings. Designs on Tlingit basketry are geometric and are mostly symmetrical. Designs often reflect local flora and must be planned out row by row. Mukhopadhyay found designs of one or three bands to be the most common.
Citations:
Chester, H. (2019). Harvesting, Processing Spruce Roots with Master Haida Weaver. Sealaska Heritage Institute. YouTube. https://www.youtube.com/watch?v=-3XNNPRVTCw&list=PLGoKk-JZWo1NsOkcyra1nio-2f4nVfZO8&index=12&pbjreload=101&ab_channel=SealaskaHeritageInstitute
Churchill, D. (2019). Spruce-Root basketry. Sealaska Heritage Institute. YouTube. https://www.youtube.com/playlist?list=PLGoKk-JZWo1NsOkcyra1nio-2f4nVfZO8
Emmons, G. (1993). The Basketry of the Tlingit and the Chilkat blanket. Friends of the Sheldon Jackson Museum.
Emmons, G.T. (1991). The Tlingit Indians. University of Washington Press.
Head, D. (2019). The Meaning of Basket Designs. Sealaska Heritage Institute. YouTube. https://www.youtube.com/watch?v=ybtM9URQbz8&list=PLGoKk-JZWo1NsOkcyra1nio-2f4nVfZO8&index=13&t=11s&ab_channel=SealaskaHeritageInstitute
Lee, M. (2006). “If It’s Not a Tlingit Basket, Then What Is It?”: Toward the Definition of an Alutiiq
Twined Spruce Root Basket Type. Arctic Anthropology, 43(2): 164-171. https://www.jstor.org/stable/40316677
Mukhopadhyay, S. (2008). The decorative impulse: ethnomathematics and Tlingit basketry. ZDM Mathematics Education, 41:117-130. DOI 10.1007/s11858-008-0151-7
Wheeler, J. (2019). Dying spruce roots. Sealaska Heritage Institute. YouTube. https://www.youtube.com/watch?v=Ew1aJiSRKpU&list=PLGoKk-JZWo1NsOkcyra1nio-2f4nVfZO8&index=7&ab_channel=SealaskaHeritageInstitute.